Giving Musicians the Tools to Make Better Music
How to Make DIY Acoustic Panels for $28! (2024 Update)

Welcome, aspiring music producers and sound enthusiasts! Today, we’re diving into a topic that’s crucial yet often overlooked in home studios – Acoustic Panels. You might be wondering, “What’s the one piece of gear I recommend for beginners above all else?” The answer is simpler than you think: Acoustic Panels. (We’ve also included a video we’ve made on the topic below!)
Why Acoustic Panels are Essential
Forget about them being mere studio decorations for Instagram. Acoustic panels are fundamental for achieving true, unadulterated sound. Imagine them as soundwave collectors, grabbing those stray echoes and reverberations that muddy your recordings. In simple terms, these panels are like your diligent neighbor who meticulously collects stamps, but here, they’re collecting stray sound waves. The result? Cleaner recordings, sharper mixing, and incredibly precise monitoring.
The Cost Barrier
Here’s the catch: Professional acoustic panels are not wallet-friendly. Especially for you, the budding music producer, who’s probably juggling budget constraints with your passion. Store-bought panels are an investment, and you might not be ready to make that leap just yet.
DIY to the Rescue
Fear not, for I’ve got you covered. Today, we’re embarking on a DIY journey to create your very own acoustic panels. Yes, you heard it right. We’re building them from scratch, and we’re doing it without draining your bank account. Let’s roll up our sleeves and get into it.
You can also follow along by downloading our free plans!
Gathering Your Materials
1. Free Building Plans
To kick things off, I’ve got a special gift for you. In the description below, you’ll find a free download link to the building plans I used for my panels. This includes a complete shopping list and a step-by-step guide.
2. Why I Made My Own Panels
A bit of background: I’ve been using DIY panels in my studio for over a decade. They’re tried and tested, and I’ve even updated the prices for you. I’ve disassembled one of my panels to give you a clear picture of how it’s put together.
3. The Materials List
Let’s start with our shopping list:
- Fabric: Choose something visually appealing and tactilely pleasant. This will cover your panels.
- Insulation Material: The core of your panels, this material will absorb the sound.
- Wood for Frames: A necessity for constructing the panel frames.
The idea here is to keep things simple and cost-effective. The materials I’ve chosen are easy to find and won’t burn a hole in your pocket.
4. Specifics and Costs
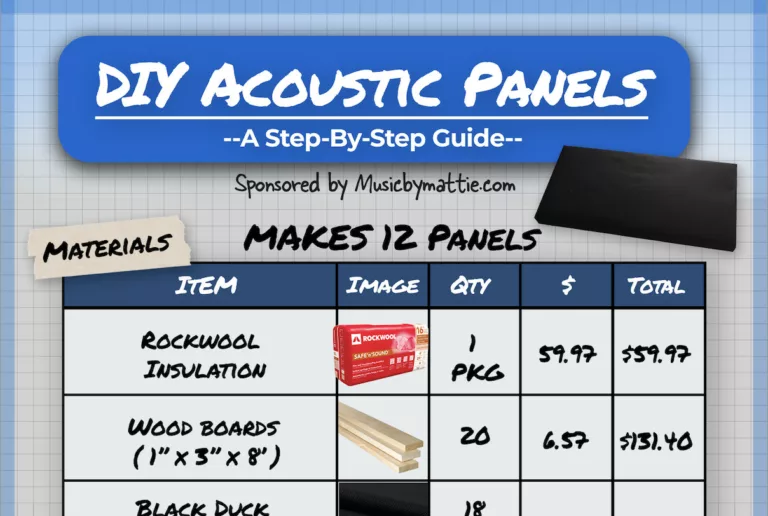
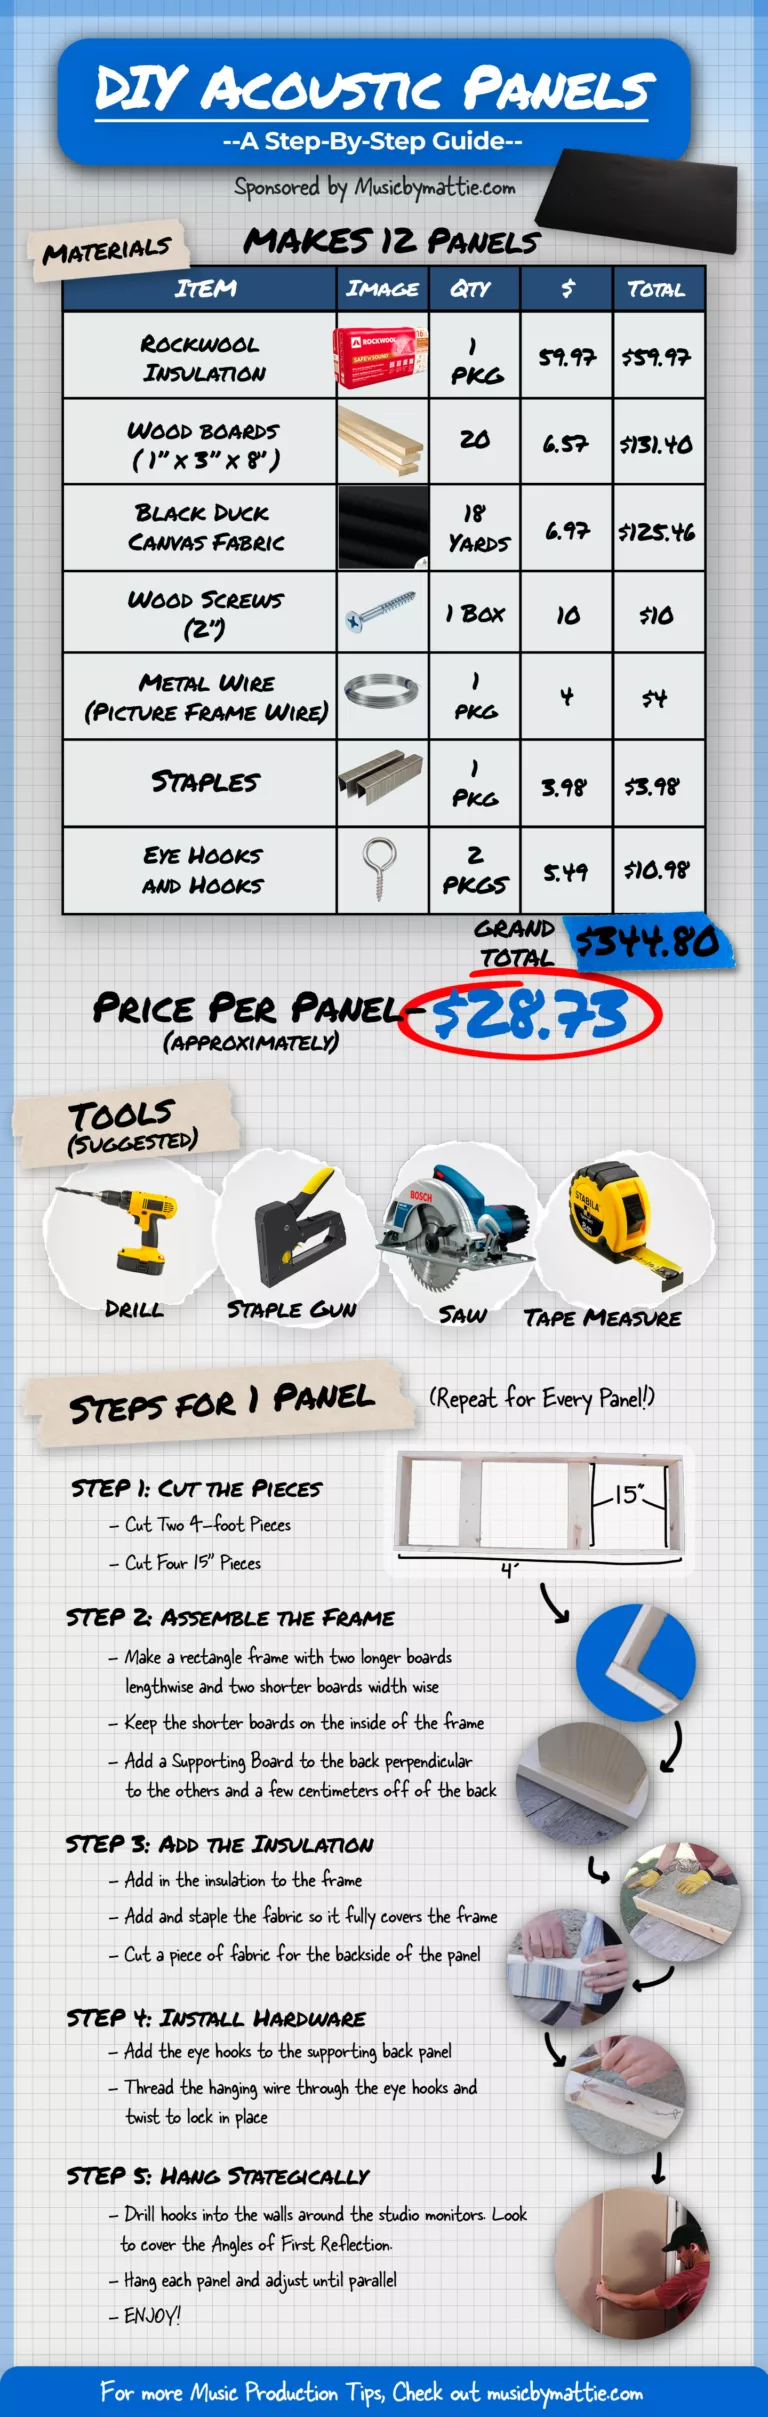
Here’s what I bought to make 12 acoustic panels:
- Rockwool Safe and Sound: $58.98 (enough for 12 panels). This insulation is sound-absorbent, affordable, and easily available.
- Black Duck Canvas: 18 Yards for $125.46 ($6.97 per Yard). This fabric will hold the insulation and let sound frequencies pass through.
- Wood Boards: 1/2″ by 4″ by 8′. I used 12 boards at $6.57 each, totaling $78.60.
- Screws and Staples: Essential for assembly. The total cost for screws and staples was around $14.
- Hanging Materials: Metal wire and hooks, which came to about $15.
Grand Total: $292.24 for 12 panels, averaging $24.35 per panel.
Tools You’ll Need
Don’t worry; you won’t need a full-fledged workshop. Here’s what you’ll require:
- Basic tools like a saw, stapler, measuring tape (and a good dose of patience).
- I recommend using a drill, a screwdriver, and a staple gun for efficiency. If you don’t have these, borrowing or using simpler tools like glue and hand saws will also work.
Our full plans! Go and download them here!
The DIY Guide: Building Your Acoustic Panels
A. Measuring and Cutting the Frame
First up, it’s time to play carpenter. You’ll be measuring and cutting wood, much like crafting a picture frame, but with a twist. The key here is precision – measure twice, cut once, and maybe let out a few swears for good measure.
For each panel, you’ll need two boards cut to 4 feet and two boards cut to 16 inches. This will form the perfect frame for each insulation piece. Don’t forget an extra 16” board for the back of the panel for support and hanging.
B. Assembling the Frame
Once you’ve got your wood pieces cut to size, it’s time to assemble the frame. This is where your inner carpenter shines. Remember to keep the frame square for a clean, professional look. Here’s how you do it:
- Drill two screws into each corner of the frame to secure it together.
- Place the extra support board about 2cm from the back edge of the frame and secure it with screws. This board is for structural integrity and will also be used for hanging the panel.
C. Adding Insulation Material
Now, for the heart of the panel: the insulation. If everything’s been measured and cut correctly, the insulation should fit snugly into the frame. This is your sound absorber, the key ingredient in your acoustic sandwich.
D. Wrapping with Fabric
Next up, wrapping your panel with fabric. This step transforms your DIY project from a rough-and-ready look to a sleek, studio-worthy piece. Here’s how:
- Stretch the fabric over the front of the panel, keeping it taut to avoid wrinkles.
- Staple the fabric to the frame, folding over the corners for a neat finish.
- Consider covering the back of the panel as well, to protect the insulation and give a polished look.
E. Installing Hardware
With the panel wrapped, it’s time to add the hardware for hanging. Attach eye hooks to the back support board. Ensure they’re aligned correctly and facing upwards. And voilà! Your panel is ready to adorn the walls of your studio.
V. Positioning Your Acoustic Panels
The Science of Placement
The placement of acoustic panels is a blend of art and science. To achieve the best sound quality, strategic positioning is key. Here’s a rundown:
Sound Source Consideration: Ideally, place your studio monitors and desk about a third into the room lengthwise. This setup helps in minimizing standing waves.
First Reflection Points: This is critical. Find the spots where sound waves first hit the walls and reflect back to your ears. Use a mirror and a friend to locate these points and mark them for your first panels.
Ceiling Reflections: Don’t forget the ceiling above your mixing desk. A panel here can absorb those vertical reflections.
Behind the Console: Placing panels behind your console helps in absorbing sound bouncing back towards you.
Bass Traps in Corners: Corners are notorious for accumulating bass frequencies. Bass traps (corner panels) can be highly effective here.
Aim to cover about a quarter to a third of your wall space with panels, focusing on areas near your mixing desk.

VI. Hanging Your Panels
Using wire to hang the panels offers flexibility and ease. Here’s the process:
- Attach a length of wire to the panel, allowing some slack.
- Wrap the wire securely around the eye hooks.
- Measure the distance from the top of the tight wire to the top of the panel to determine where to place the wall hook.
- Once hung, you can adjust the panels by rotating them on their hooks.
- For ceiling panels, use multiple eye hooks and ceiling hooks to distribute the weight evenly.
VI. The Sound Test: Before and After
Witnessing the Transformation
Now, the moment of truth. Untreated rooms often suffer from rampant sound reflections. A simple clap test can reveal the stark difference:
- Before Panels: Notice the excessive reverb and echo.
- After Panels: The sound is markedly clearer, with reduced reverb. Recordings become easier to mix.
Acoustic panels are a transformative addition to any studio. They outvalue the latest plugin or fancy gear, not just in terms of cost but in the quality of sound they help achieve.
Conclusion
Building your own acoustic panels is not just a cost-effective solution but a rewarding DIY project that significantly improves your sound quality. Remember, I’ve got detailed plans and a list of materials available for free download in the description.
Don’t miss out on my upcoming video detailing the ideal home studio setup. Subscribe to stay updated!
Until next time, happy recording, and may your sound be ever clear and crisp!
Thanks for reading! If you still need help, check out my Free Vocal Presets for Logic Pro X that will get your vocals sounding amazing in no time!!

Mattie
Check Out Our Other Articles!
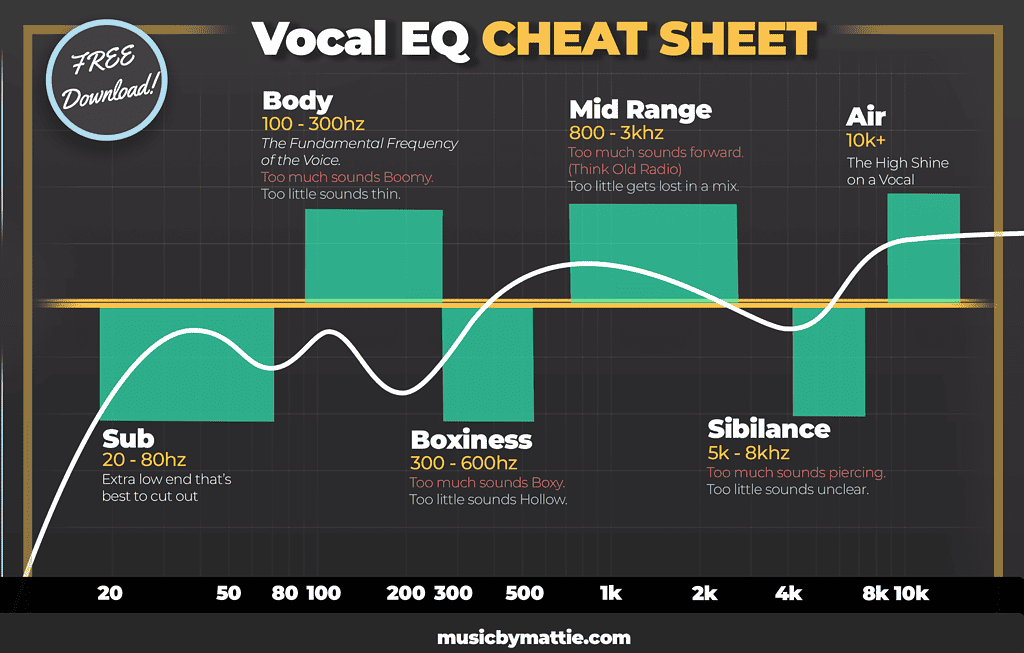
Download our FREE Vocal EQ Cheat Sheet!
Mattie
Post Info

Join "5 Beat Friday"
Every week you'll get 5 beats about the production world. Join the over 5,000+ other producers bettering themselves through 5 Beat Friday!